
ActivityHD Accounts Payable effectively manages your vendors, invoices, and payments, giving you greater control of your organization's expenses and improving the bottom line.
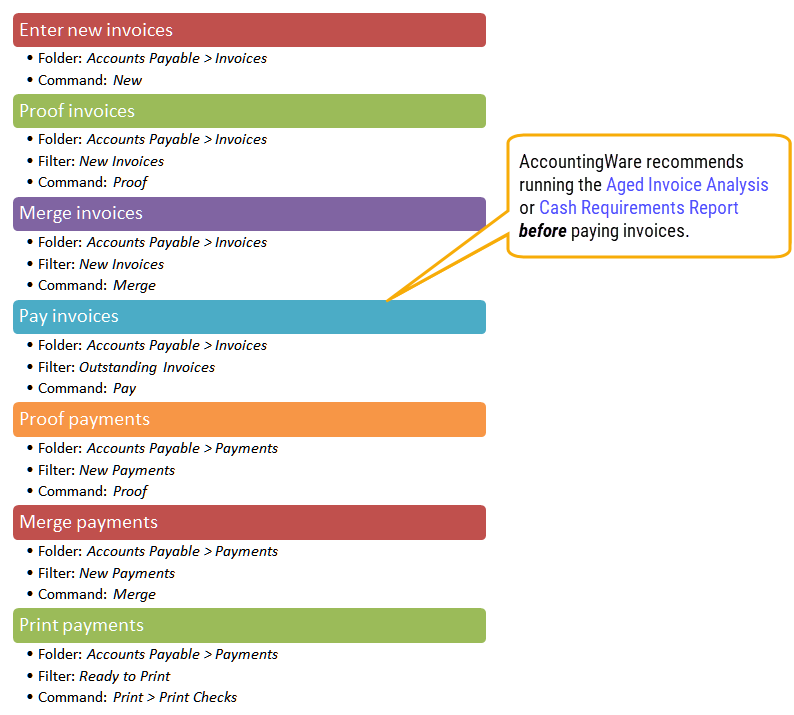
Create an invoice
- In the Navigation pane, highlight the Accounts Payable > Invoices folder.
- Click
 . The New AP Invoice window opens.
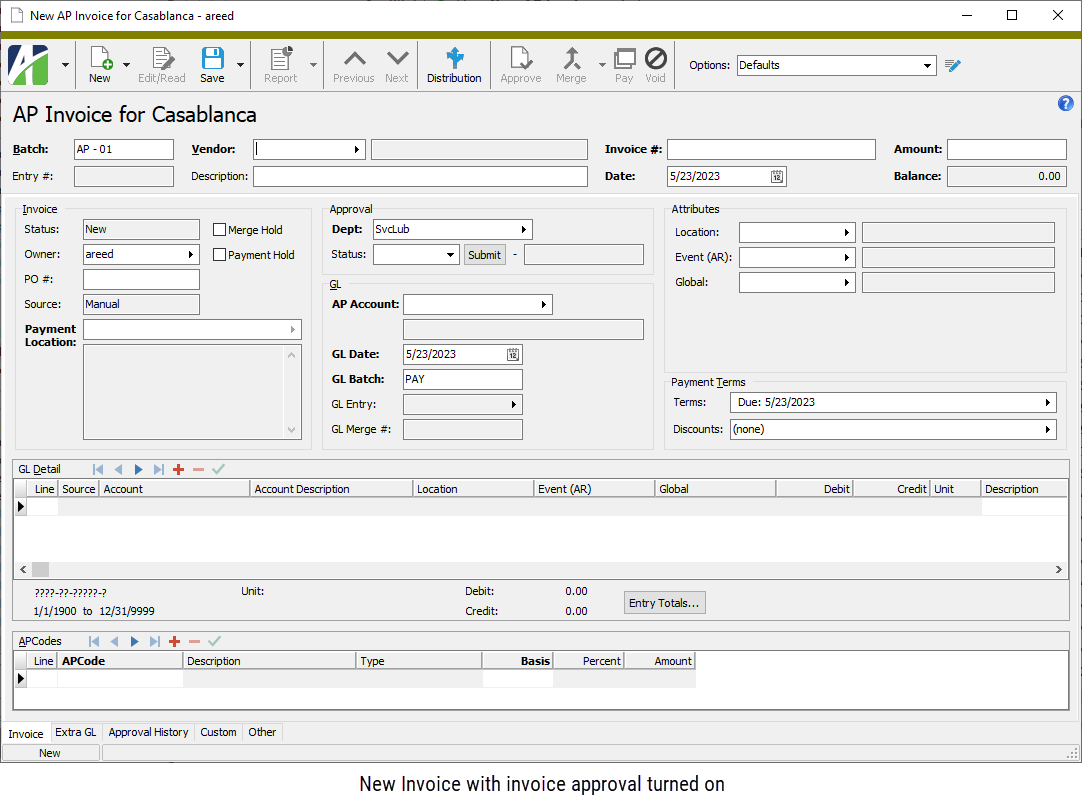
-
Enter the name of the Batch of AP invoices to include the invoice in. The default batch name is the batch from the selected options profile, or the batch from the last invoice entered if the batch name on the profile is blank.
Example
You could use the name of the month or your initials. - Select the Vendor you are entering the invoice for.
- Enter a Description of the invoice. You can use up to 60 characters.
- Enter the Invoice # from the invoice document.
- Enter the invoice Date.
- Enter the total Amount of the invoice including tax, freight charges, handling charges, and all other items billed on the invoice before any discounts are applied. Negative amounts can be entered. You can distribute the extra expenses to the appropriate GL accounts in the GL Detail table.
- If the Purchasing package is installed, the Owner field is visible in the Invoice section. Select the purchasing operator responsible for the invoice.
- Enter the PO # which resulted in the invoice. This field is optional unless the vendor is set up to require a purchase order number.
- If you need to prevent the invoice from being merged temporarily, mark the Merge Hold checkbox. This option is useful if the invoice needs further attention before it is processed.
- If you need to withhold payment on this invoice temporarily, mark the Payment Hold checkbox. Invoices on payment hold cannot be paid in the group pay process; however, they can be paid individually although ActivityHD does issue a warning.
- In the Payment Location field, select the vendor payment location for this invoice. This field defaults to the vendor's default payment location.
- If invoice approval is enabled, the Approval section is visible. In the Dept field, select the purchasing department responsible for invoice approval.
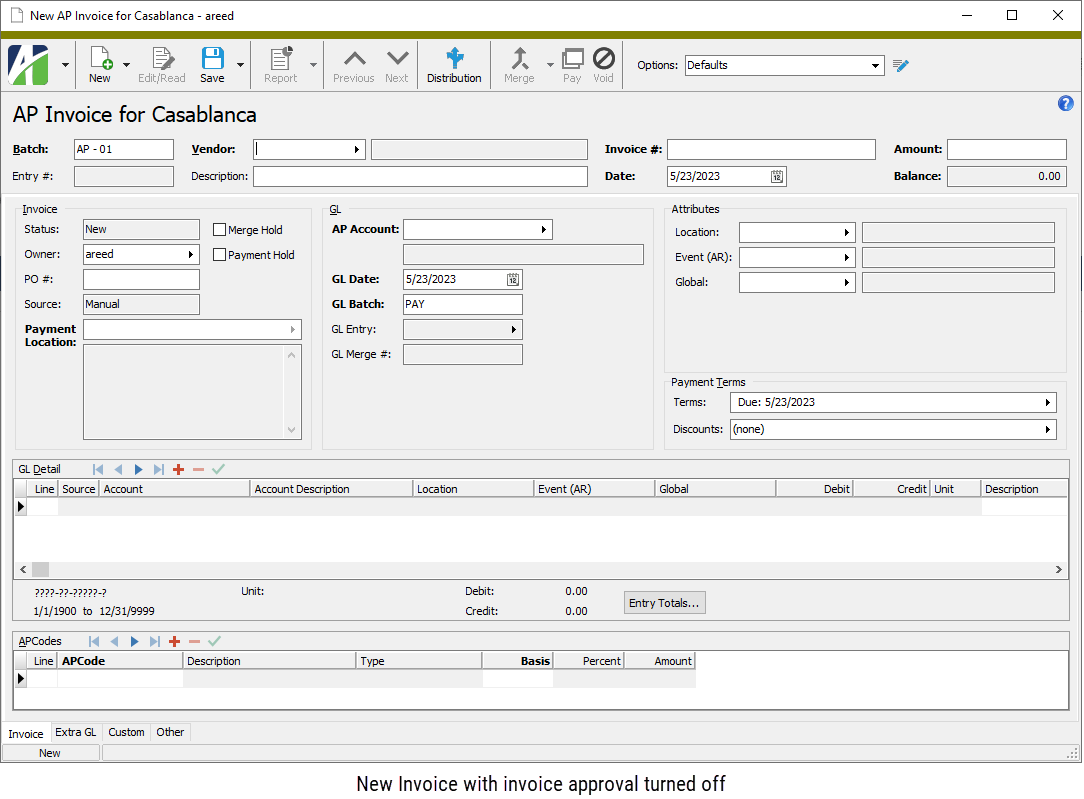
- In the AP Account field, enter the liability account to credit for the invoice. The account number defaults from the liability account specified on the vendor's record or from the default on the vendor in conjunction with the account mask from the invoice options. If you override the default account number, the number displays in purple. Partial or invalid accounts are allowed in this field until the invoice is merged. Partial or invalid accounts are highlighted in yellow.
- In the GL Date field, enter the date to record the detail postings for the invoice. The default date is the invoice date or the date specified in the invoice options.
- Enter the name of the GL Batch to include the invoice in when it is merged. The default GL batch name is the GL batch from the selected options profile, or the GL batch from the last invoice entered if the GL batch name on the profile is blank.
-
In the Attribute field(s), enter the appropriate attribute value(s) for the invoice. In particular, be sure to enter values for required attributes. If default attribute items are defined on the vendor record, they are copied to these fields. You can override or blank out the default attribute items as needed.
Invoice-level attributes are automatically applied to the detail distribution lines but can be overridden if the attribute is configured for invoice detail usage. Account mask requirements for the liability and debit accounts can be specified on attribute items.
Note
If an attribute is flagged for "Use on GL Detail" and to "Follow Calendar Post Control" and to "Post to GL" for AP and the invoice is merged and the corresponding GL journal entry (for the invoice or the extra GL detail line) is merged and the post control is "Error", the attribute item on an invoice cannot be changed. If those conditions exist but the post control is "Warning", a message is displayed before the attribute item can be changed.
The post control in effect is determined as follows:
- If there is a segment-specific control calendar on the GL account from the GL detail or extra GL line, use the control calendar. Otherwise, use the default calendar.
- Open the calendar period that contains the posting date from the GL detail or extra GL line. If there is an AP-specific post control for the period, use it.
- If the period of the posting date is outside the periods before or the periods after the current period, use the post control on the calendar.
- To enter payment terms for the invoice, click in the Terms field. The Invoice Payment Terms dialog opens. To skip payment terms, skip to step 25.
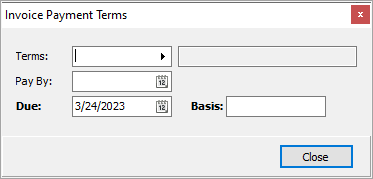
- In the Terms field, select the payment terms for the invoice. The default terms come from the vendor record. The discount date, due date, and basis are calculated based upon the payment terms and invoice date.
- In the Pay By field, enter the date by which to pay the invoice.
- The date the payment is Due is calculated from the payment terms. If you need to override the date, enter the actual due date.
- The Basis field defaults to an amount calculated based on the invoice amount and payment terms. If the amount subject to discount is different, enter the actual discount basis amount.
- Click Close.
- To enter discount information for the invoice, click in the Discounts field. The Invoice Discount Dates dialog opens. If no discount applies, skip to step 28.
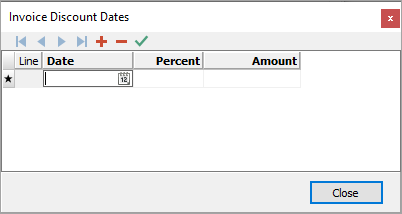
- The information in the Discount Dates table defaults from the payment terms. If the payment terms did not include discount information or if you need to override the information in the table, do the following for each discount date:
- In the Date field, enter the latest date that a payment can be received on the invoice in order to receive the discount shown in this row.
- If you know the discount rate, enter the rate in the Percent field; the Amount is calculated for you. If you know the Amount of the discount, enter it; the Percent is calculated for you.
- When you finish, click Close.
-
Next, turn your attention to the GL Detail table. Notice in the GL Detail table that ActivityHD automatically creates a detail line with a source of "Invoice" to credit the AP liability account for the invoice. Moreover, if the purchase is subject to use tax, the use tax is calculated based on the APCode specified in the APCodes table and a detail line is added to the GL Detail table. Neither of these lines can be edited directly except for their Description and Memo fields.
- Because some entries in the APCodes table may affect the distribution amount, first examine the APCodes table to determine if you need to add, remove, or change any rows.
- To add a row, start with your cursor in the APCodes table and click
 . In the APCode column, select the APCode to add. The value in the Basis column defaults to the invoice basis amount. If you need to change the basis, enter the amount of the invoice that is subject to the APCode.
 - To remove a row, start with your cursor in the row you need to remove and click
 . ActivityHD prompts you to confirm the action. Click OK.
 - To change a row, go into that row and select a new APCode and/or change the Basis amount as needed.
Note
"Payment Withholding" APCodes are not allowed on invoices which are paid by Quick Pay.
- To add a row, start with your cursor in the APCodes table and click
- You can complete the distribution in a couple of ways:
- Use the Distribution wizard to apply a distribution template.
- Click
 . The dialog box opens.
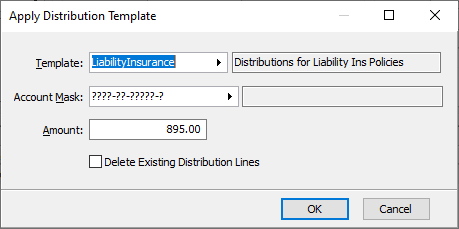
- In the Template field, select the distribution template to use for the distribution. The default template is the template designated on the vendor record.
- The Account Mask field shows the combination of the account mask on the distribution template and the account mask specified on the vendor record (if applicable). If there are blanks remaining in the account mask, fill them with wildcards or actual segment item codes.
- The Amount field defaults to the undistributed amount. Enter the amount to distribute to the designated account mask.
- If you want to remove existing GL detail lines from the distribution before applying the distribution template, mark the Delete Existing Distribution Lines checkbox.
- Click OK.
- Repeat these steps, if necessary, until you distribute the entire amount.
- Click
- Distribute amounts manually.
- Add a new row to the GL Detail table.
In the Account column, select the account number to post the detail line to. The default account on each new invoice GL detail line (excluding liability, use tax, and intercompany lines) is the default distribution account from the vendor record. If you override the default account number, the number displays in purple.
Note
You can enter partial or invalid accounts in this field. You can merge an invoice with partial or invalid accounts, but you cannot merge the associated GL entry or void the invoice until all accounts are valid.
Reasons you might want to enter a partial or invalid account include:
- You only know part of the account number when the invoice is entered.
- You know the correct account number, but it hasn't been created in the General Ledger yet.
- The distribution wizard or the intercompany function resulted in an invalid account. (While the intercompany function may result in an invalid account, invalid accounts are excluded from the source of the intercompany function.)
Partial or invalid accounts are highlighted in yellow in the Invoice window and in Invoice GL Detail.
If there are one or more active attributes with invoice detail usage, a column for each of these attributes appears in the table after the Account Description. If applicable, enter the appropriate attribute items in these columns. You can only apply attribute values on distribution lines, not on AP liability, intercompany, or use tax lines. Attribute items with a debit account mask defined on them can contribute to the GL account on the invoice line. If default attribute items are defined on the vendor record or invoice-level attributes are specified, they are copied to these columns. You can override or blank out the default attribute items as needed. If a default attribute item is overridden, the attribute item displays in purple.
Attribute values automatically appear on the associated journal entries if the attribute is configured to post to General Ledger.
In the Debit column, enter the amount to debit the corresponding account.
Note
If your cursor is in an editable line of the GL Detail table, you can press Ctrl+B or select
 > Tools > Distribute Balance to automatically enter the debit amount needed to balance the distribution.
- Repeat these steps, if necessary, until you distribute the entire amount.
- Use the Distribution wizard to apply a distribution template.
-
If your system is set up to handle intercompany postings and the current invoice requires that you create intercompany postings, select
> Tools > Create Intercompany Detail or press Ctrl+I. (This command is visible only if your system is set up for intercompany postings.) ActivityHD automatically generates the intercompany receivables and payables detail lines and adds them to the distribution table below the existing GLNotes
- Intercompany detail lines cannot be edited in the table; however, you can delete them individually.
- You can generate intercompany postings multiple times if you make changes to the distribution. ActivityHD always deletes the existing intercompany detail lines and replaces them with new detail lines based on the current distribution information.
- When you finish, save the new invoice. ActivityHD generates the entry number at this time.
Merge invoices
Before an invoice can be paid it must be merged. Merging automatically creates a general ledger entry for the invoice and sends it to General Ledger for posting.
- In the Navigation pane, highlight the Accounts Payable > Invoices folder.
- Start the Merge Invoices wizard.
- To merge all or a filtered subset of invoices:
- Right-click the Invoices folder and select Select and Merge from the shortcut menu.
- On the Selection tab, define any filters to apply to the invoices.
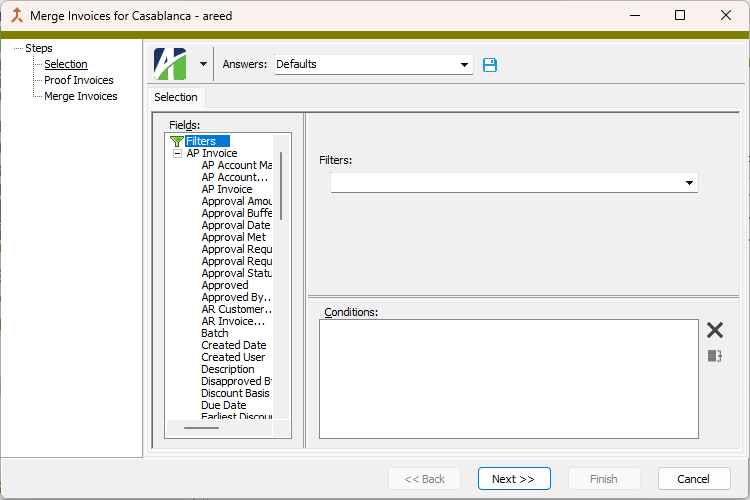
Tip
Apply the "New Invoices" filter to select unmerged invoices.
- Click Next >>.
- To merge specifically selected invoices:
In the HD view, select the invoices to include in the merge. You can use Ctrl and/or Shift selection to select multiple invoices.
Tip
Apply the "New Invoices" filter to see all unmerged invoices.
- Click
 .
.
- To merge all or a filtered subset of invoices:
- The wizard reports the number of invoices that are valid for merging.
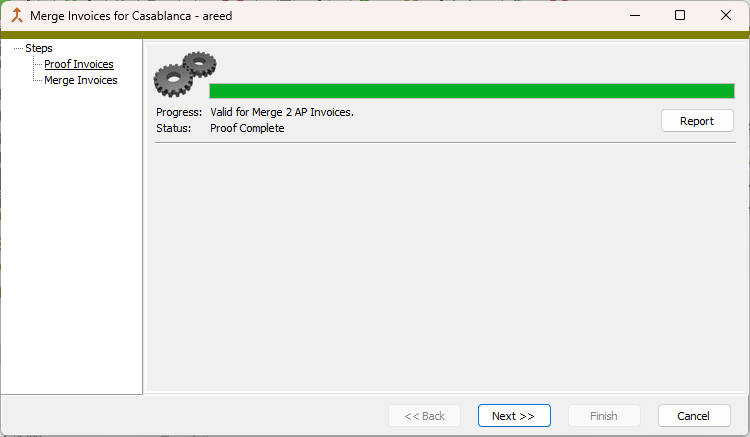
If the validation returns errors or warnings, ActivityHD lists the reasons why.
If you want to view or print the Merge AP Invoices Proof Report, click Report. Otherwise, skip to step 10.

- On the Options tab in the Validation Status? field, select which invoices to include on the merge report. Your options are:
- Valid Invoices. Only shows the invoices that are not valid for merging on the report. This option is disabled if there are no valid invoices in your selection. This option is preselected and the other options are disabled if all the invoices are valid.
- Exceptions. Only shows the invoices that were not merged on the report. This option is disabled if there are no invalid invoices in your selection. This option is preselected and the other options are disabled if all the invoices are invalid.
- Both. Shows both valid and invalid invoices on the report. This option is disabled if all the invoices are valid or if all the invoices are invalid.
- Ensure the checkboxes for the additional information you want to include on the report are marked. The first nine checkboxes are marked by default. Your options include:
- Validation Messages
- Approval Status (only visible when Purchasing is installed and AP invoice approval is enabled)
- Approval History (only visible when Purchasing is installed and AP invoice approval is enabled)
- Payment Locations, Terms, and Quick Pay
- Attributes
- APCodes
- GL Detail
- Extra GL
- GL Summary
- Timestamps
- Memos
- Select the Output tab.
- In the Design field, look up and select the report design to use.
- In the toolbar, click the icon for the type of output you want:
 - Provides access to two preview options.
- Preview - Click the icon or click the drop-down arrow and select Preview from the drop-down menu to view the report in the Crystal Reports viewer.
- Preview to PDF - Click the drop-down arrow next to the icon and select Preview to PDF to view the report in the PDF reader.
 - Opens the Print dialog so that you can select and configure a printer and then print a paper copy of the report.
 - Opens the dialog so that you can address and compose an email that the report will be attached to. For best results, ensure your email client is running before you attempt to send a report via email.
 - Opens the Export Report dialog so that you can save the report to a file. File types include Crystal Reports (.rpt), PDF (.pdf), Microsoft Excel (.xls), Microsoft Word (.doc), rich text (.rtf), and XML (.xml).
- When you finish with the Merge AP Invoices Proof Report, close the Merge AP Invoices Proof Copy dialog.
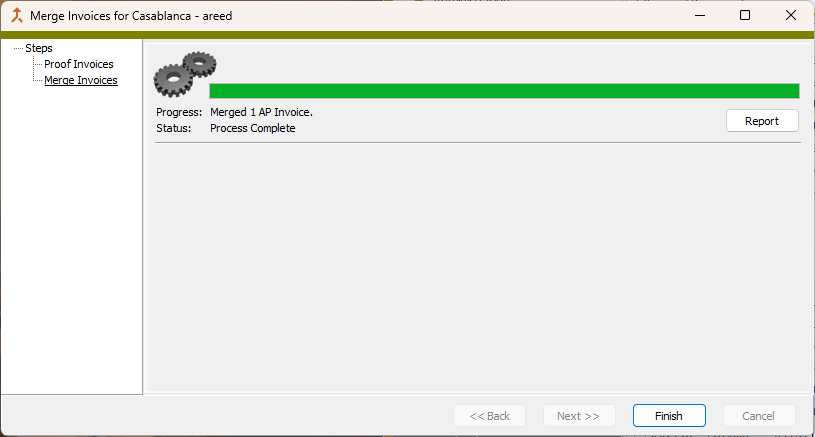
- Back in the Merge Invoices wizard, click Next >>. ActivityHD merges the invoices and reports its results.
If desired, you can print or preview the proof report again, this time showing only the invoices which were successfully merged. To do so, click Report and repeat steps 4-9.
- Click Finish. The invoices are now merged and outstanding, ready to be paid.
Pay invoices
The Pay Invoices process allows you to pay multiple invoices at a time. ActivityHD creates a new payment for each vendor and payment location combination in your selection. Multiple outstanding invoices for the same vendor are paid on the same payment unless the invoices have different payment locations.
Invoices selected for payment must be merged before payments can be created.
To pay invoices:
- In the Navigation pane, highlight the Accounts Payable > Invoices folder.
- Start the Pay Invoices wizard.
- To pay all or a filtered subset of invoices:
- Right-click the Invoices folder and select Select and Pay from the shortcut menu.
- On the Selection tab, define any filters to apply to the invoices.
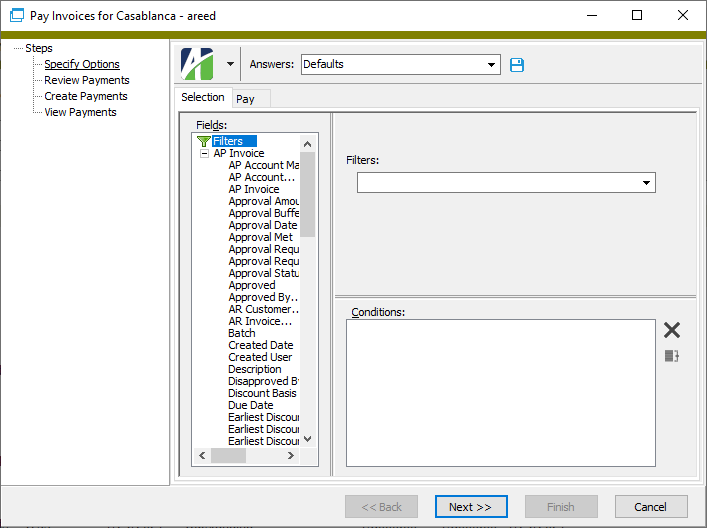
Tip
Apply the "Outstanding Invoices" filter to select the invoices eligible to be paid.
- To pay specifically selected invoices:
In the HD view, select the invoices to pay. You can use Ctrl and/or Shift selection to select multiple invoices.
Tip
Apply the "Outstanding Invoices" filter to see all invoices eligible to be paid.
- Click
 .
.
- To pay all or a filtered subset of invoices:
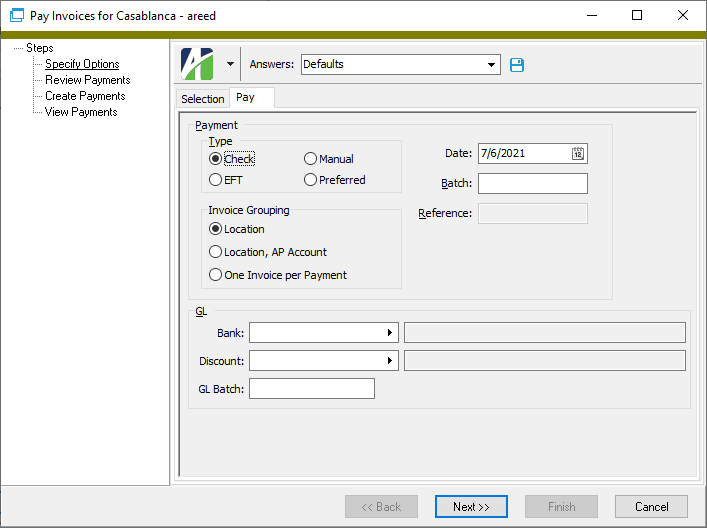
- On the Pay tab in the Type field, select how to distribute the net pay amount to the vendor. Your options are:
- Check. Print checks. ActivityHD requires you to disburse the payments before they can be merged.
- EFT. Use electronic funds transfer (EFT).
- Manual. Record a manual payment. If you select this option, the Reference field is enabled so you can record payment information such as the manual check number.
- Preferred. Use each vendor's preferred payment method from the vendor's Defaults tab.
- In the Invoice Grouping field, select how to group invoices for payment for those vendors whose vendor grouping option is "Use Invoice Payment Process Default". The grouping option for vendors who selected a different option will be honored. Your options are:
- Location. Group invoices for a vendor by payment location and produce one payment per payment location.
- Location, AP Account. Group invoices for a vendor by payment location and by AP account. Produce one payment for each different payment location/AP account combination.
- Invoice. Produce a separate check for each invoice.
- In the Date field, enter the payment date for the invoices. The payment date is used to calculate the available discount amount, backup withholding, and the GL posting date.
- Enter the name of the Batch to use for processing the AP payments. Batch names are useful for selecting groups of payments to proof, merge, or delete.
- If you selected "Manual" or "Preferred" in the Payment field, the Reference field is enabled. Enter a short reference, typically the check number, for the payment. This field is limited to 20 characters.
- In the Bank field, enter the GL account to credit with the net pay amounts.
- In the Discount field, enter the GL account to credit with the discount amounts for the payments.
- Enter the name of the GL Batch to use when payments are merged.
- Click Next >>. The Payment Detail table lists the invoices selected for payment.
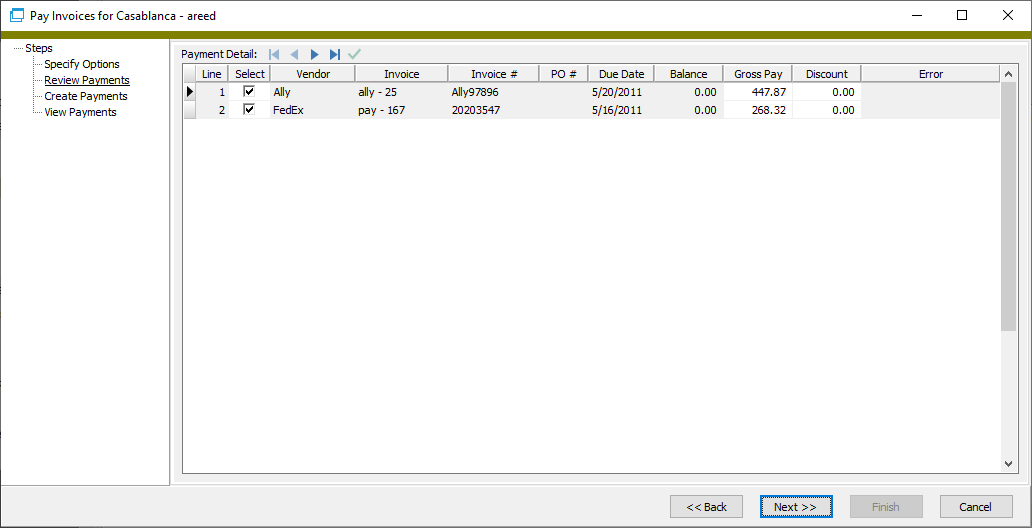
- In the Pay Detail table, do none, any, or all of the following:
- Clear the Select checkbox for any invoice(s) you want to exclude from the payment process.
- Edit the Gross Pay amount on invoices as needed.
- Edit the Discount amount on invoices as needed.
- Press F4 in the Vendor column to open the vendor record for the corresponding payment.
- Press F4 in the Invoice column to open the AP invoice record for the corresponding payment.
- When you finish, click Next >>. ActivityHD prompts to confirm that you want to make the payments.
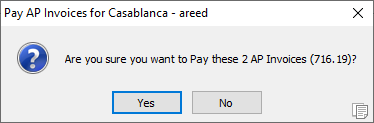
- Click Yes.
- Click Next >>.
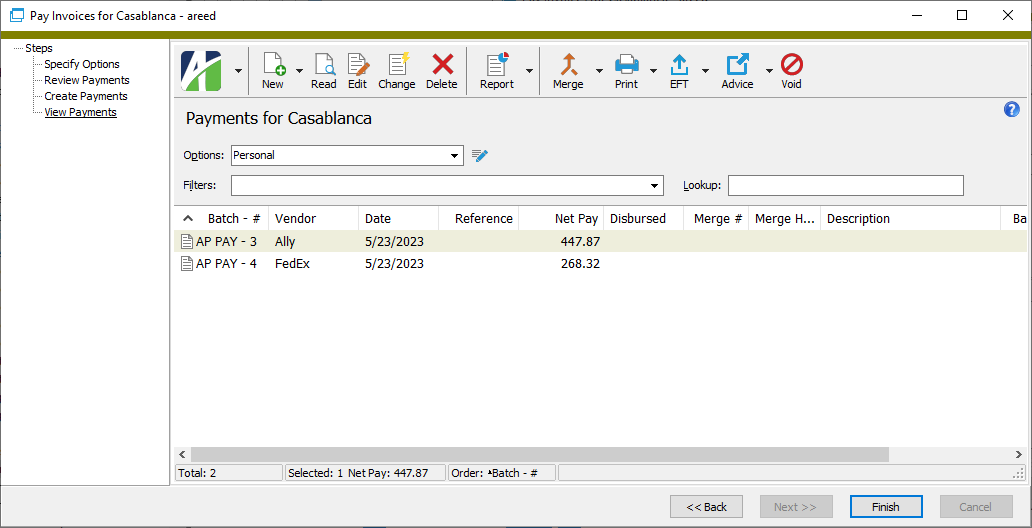
At this point, you can double-click a payment in the right pane to drill down to the Payment window, print the Payments Listing, proof the payments for merging, merge the payments, print checks or generate EFT payments and then generate remittance advice, or void payment(s).
- When you finish viewing or working with the payments, click Finish.
Merge payments
When you merge AP payments, ActivityHD creates the GL entries for the payments.
- In the Navigation pane, highlight the Accounts Payable > Payments folder.
- Start the Merge Payments wizard.
- To merge all or a filtered subset of payments:
- Right-click the Payments folder and select Select and Merge from the shortcut menu.
- On the Selection tab, define any filters to apply to the payments.
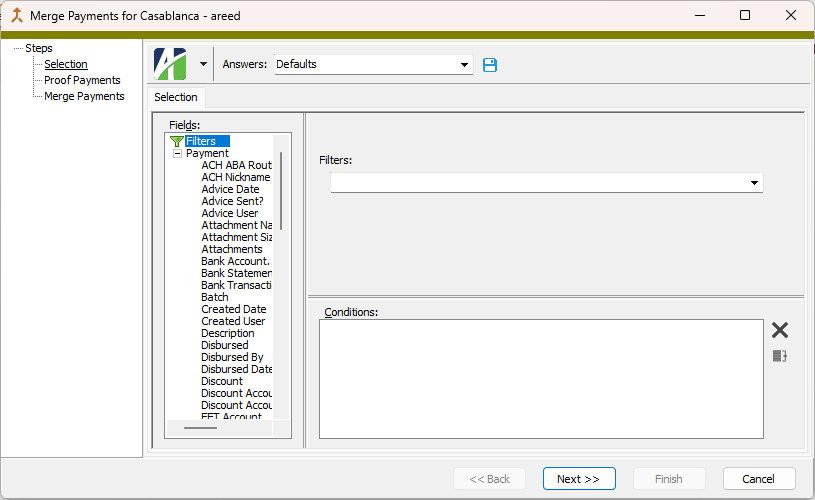
Tip
Apply the "New Payments" filter to select the unmerged payments.
- Click Next >>.
- To merge specifically selected payments:
In the HD view, select the payments to include in the merge. You can use Ctrl and/or Shift selection to select multiple payments.
Tip
Apply the "New Payments" filter to see all unmerged payments.
- Click .
- To merge all or a filtered subset of payments:
- The wizard reports the number of payments that are valid for merging.
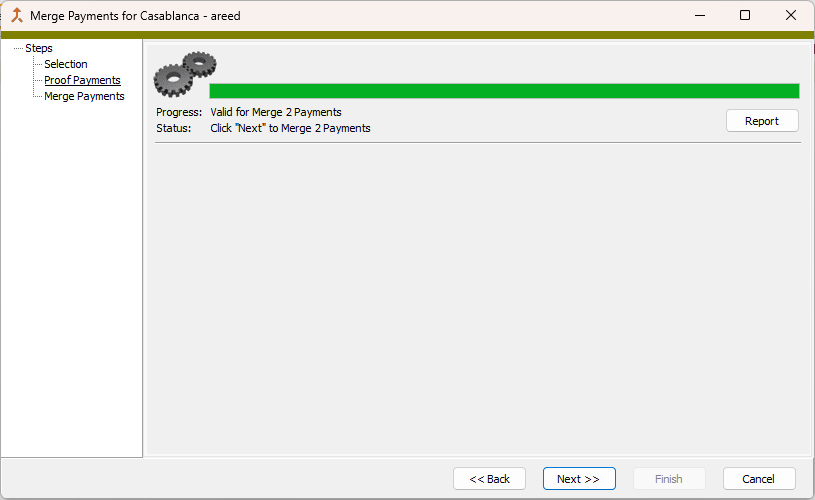
If the validation returns errors or warnings, ActivityHD lists the reasons why.
If you want to view or print the Merge AP Payments Proof Report, click Report. Otherwise, skip to step 10.
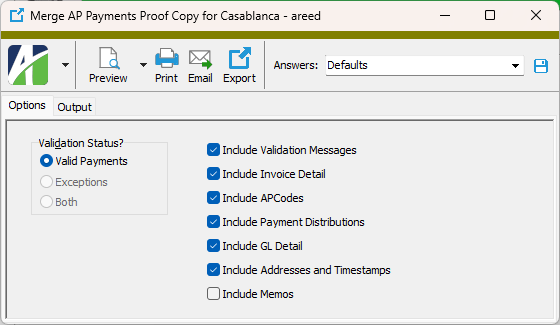
- In the Validation Status? field, select which payments to include on the Merge AP Payments Transaction Report. Your options are:
- Valid Payments. Only shows the payments that are valid for merging on the report. This option is disabled if there are no valid payments in your selection. This option is preselected and the other options are disabled if all the payments are valid.
- Exceptions. Only shows the payments that are not valid for merging on the report. This option is disabled if there are no invalid payments in your selection. This option is preselected and the other options are disabled if all the payments are invalid.
- Both. Shows both valid and invalid payments on the report. This option is disabled if all the payments are valid or if all the payments are invalid.
- Ensure the checkboxes for the additional information you want to include on the report are marked. The first six checkboxes are marked by default. Your options include:
- Validation Messages
- Invoice Detail
- APCodes
- Payment Distributions
- GL Detail
- Addresses and Timestamps
- Memos
- Select the Output tab.
- In the Design field, look up and select the report design to use.
- In the toolbar, click the icon for the type of output you want:
- - Provides access to two preview options.
- Preview - Click the icon or click the drop-down arrow and select Preview from the drop-down menu to view the report in the Crystal Reports viewer.
- Preview to PDF - Click the drop-down arrow next to the icon and select Preview to PDF to view the report in the PDF reader.
- - Opens the Print dialog so that you can select and configure a printer and then print a paper copy of the report.
- - Opens the dialog so that you can address and compose an email that the report will be attached to. For best results, ensure your email client is running before you attempt to send a report via email.
- - Opens the Export Report dialog so that you can save the report to a file. File types include Crystal Reports (.rpt), PDF (.pdf), Microsoft Excel (.xls), Microsoft Word (.doc), rich text (.rtf), and XML (.xml).
- When you finish with the Merge AP Payments Proof Report, close the Merge AP Payments Proof Copy dialog.
- Back in the Merge Payments wizard, click Next >>. ActivityHD merges the payments and reports its results.
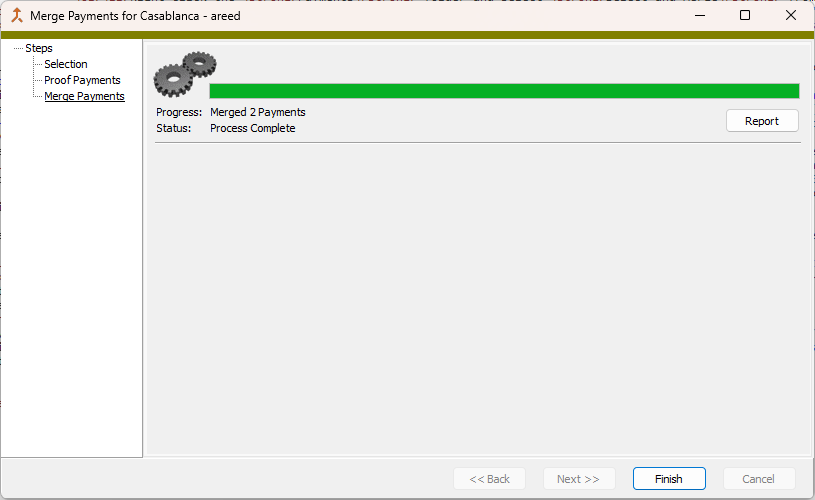
If desired, you can print or preview the proof report again, this time showing only the payments which were successfully merged. To do so, click Report and repeat steps 4-9
- Click Finish.
Print checks
tAfter you've input and merged payments, you can print checks for the payments or you can pay electronically using electronic funds transfer (EFT). The procedure that follows describes how to print physical checks. To learn how to process EFT payments, see "Generate EFTs".
Print AP checks
- In the Navigation pane, highlight the Accounts Payable > Payments folder.
- Start the Print Checks wizard.
- To print checks for all or a filtered subset of payments:
- Right-click the Payments folder and select Print Checks > Select and Print Checks from the shortcut menu.
- On the Selection tab, define any filters to apply to the payments.
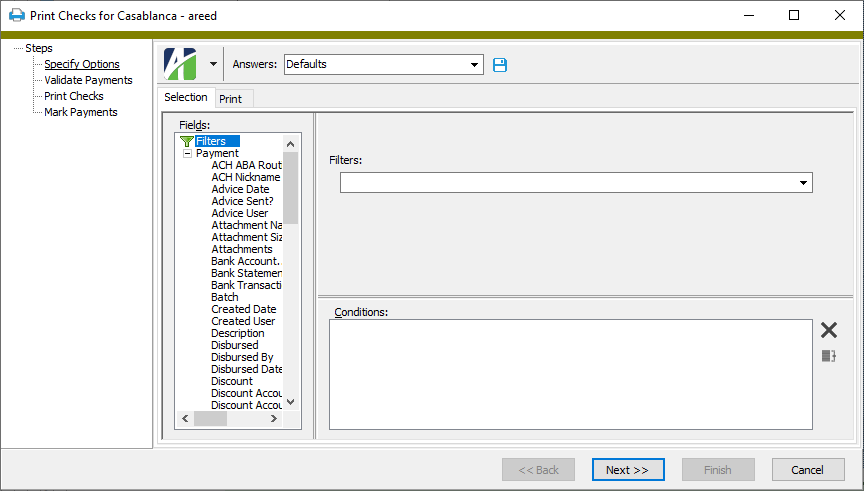
Tip
Apply the "Ready to Print" filter to select the payments eligible for printing.
- To print checks for specifically selected payments:
In the HD view, select the payments to print checks for. You can use Ctrl and/or Shift selection to select multiple payments.
Tip
Apply the "Ready to Print" filter to see all payments eligible for printing.
- Click
 .
.
- To print checks for all or a filtered subset of payments:
- Select the Print tab.
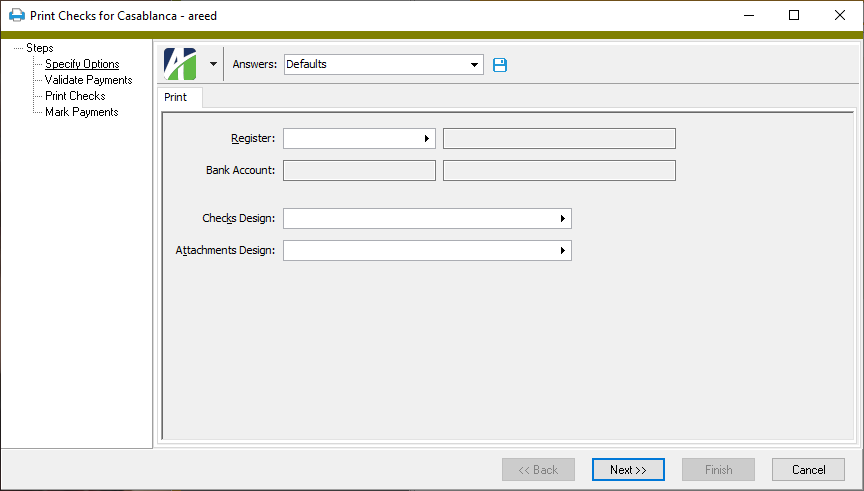
- In the Register field, select the check register to record checks in.
-
In the Checks Design field, select the report design to use for printing checks.
Notes
The Print Checks process can print Payroll employee payment detail on AP checks which pay AP invoices generated from Payroll. If the PR/AP interface is installed, the following built-in report designs are available to demonstrate how to use subreports to print employee payment detail.
- Attachments with PR
- Deluxe Laser 81064 with PR
- NEBS 299 with PR
The Print Checks process can print purchase detail on AP checks which pay AP invoices generated from Purchasing. If Purchasing is installed, the following built-in report designs are available to demonstrate how to use subreports to print purchase detail.
- Attachments with PO
- Deluxe Laser 81064 with PO
- NEBS 299 with PO
- In the Attachments Design field, select the report design to use for the check attachments.
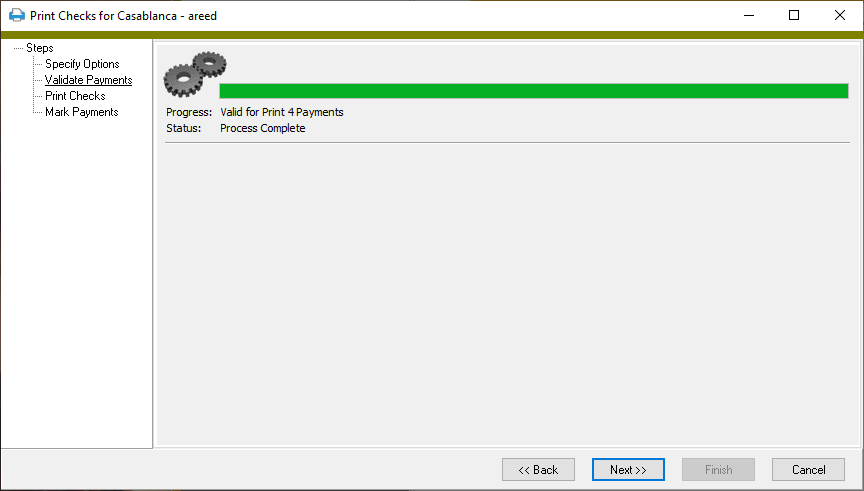
- Click Next >>. ActivityHD validates the checks for printing.
- Click Next >>.

Take a closer look
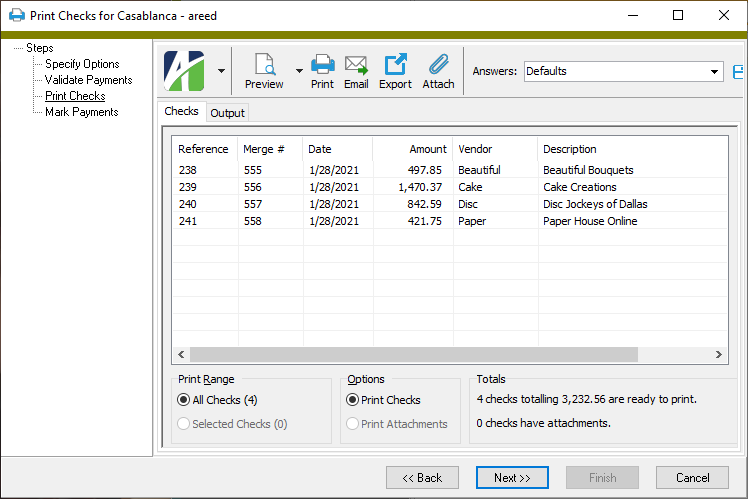
Right-click in the Checks table to reveal more options.
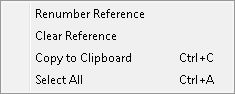
Renumber Reference. Renumbers the checks in your selection starting with the check number you designate. Gaps in check numbers produce a voided forms entry in Bank Reconciliation.
Clear Reference. Clears the Reference field for the checks in your selection.
Copy to Clipboard. Copies the selected check information to your clipboard for pasting elsewhere.
Select All. Selects every check in the table.
- To print all the checks listed in the table, accept the "All Checks" selection in the Print Range field. To print only selected checks, highlight the checks to print in the table and select "Selected Checks" in the Print Range field. You can use Ctrl and/or Shift selection to select multiple checks in the table.
- In the Options field, select "Print Checks".
- In the toolbar, click the icon for the type of output you want:
- - Provides access to two preview options.
- Preview - Click the icon or click the drop-down arrow and select Preview from the drop-down menu to view the checks in the Crystal Reports viewer.
- Preview to PDF - Click the drop-down arrow next to the icon and select Preview to PDF to view the checks in the PDF reader.
- - Opens the Print dialog so that you can select and configure a printer and then print a paper copy of the checks.
- - Opens the Report Email Options dialog so that you can address and compose an email that the checks will be attached to.
- - Opens the Export Report dialog so that you can save the checks to a file. File types include Crystal Reports (.rpt), PDF (.pdf), Microsoft Excel (.xls), Microsoft Word (.doc), rich text (.rtf), and XML (.xml).
 - Attaches a copy of each check to its payment record.
- If you need to print attachments for the checks, repeat steps 9-11 but select "Print Attachments" in the Options field.
- When you finish, click Next >>.
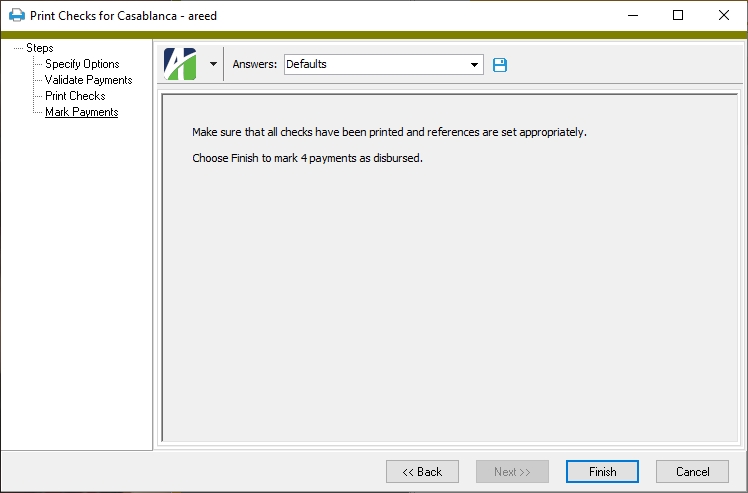
- When you are certain that checks have printed properly, click Finish to mark the checks as disbursed.
Aged Invoice Analysis
Purpose
Invoice aging categorizes outstanding invoices by how long they have gone unpaid. The Aged Invoice Analysis report shows amounts owed to vendors by aging category. This report is useful for determining cash outflow.
Content
For each vendor included on the report, the report shows:
- vendor name
- vendor balance
- vendor totals by aging category.
In addition, you can include:
- invoice information.
If you include invoice information, for each invoice represented on the report, the report shows:
- invoice number
- due date
- invoice balance
- invoice amount by aging category.
The following totals appear on the report:
- grand totals for balance and aging categories.
Preinstalled saved answers
For your convenience, ActivityHD includes two preinstalled saved answers for common reporting scenarios:
- "Current Aging"
- "Reconcile to General Ledger"
Print the report
- In the Navigation pane, highlight the Accounts Payable > Vendors folder.
- Start the report set-up wizard.
- To report on all or a filtered subset of vendors:
- Right-click the Vendors folder and select Select and Report > Aged Invoice Analysis from the shortcut menu.
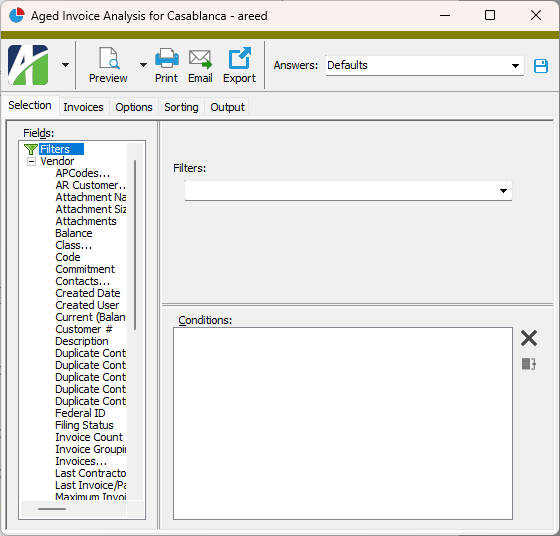
- On the Selection tab, define any filters to apply to the data.
- To report on specifically selected vendors:
- In the HD view, select the vendors to include on the report. You can use Ctrl and/or Shift selection to select multiple records.
- Click
 and select Aged Invoice Analysis from the drop-down menu.
- To report on a particular vendor from the Vendor window:
- In the HD view, locate and double-click the vendor to report on. The Vendor window opens with the vendor loaded.
- Click and select Aged Invoice Analysis from the drop-down menu.
- To report on all or a filtered subset of vendors:
- Select the Invoices tab.
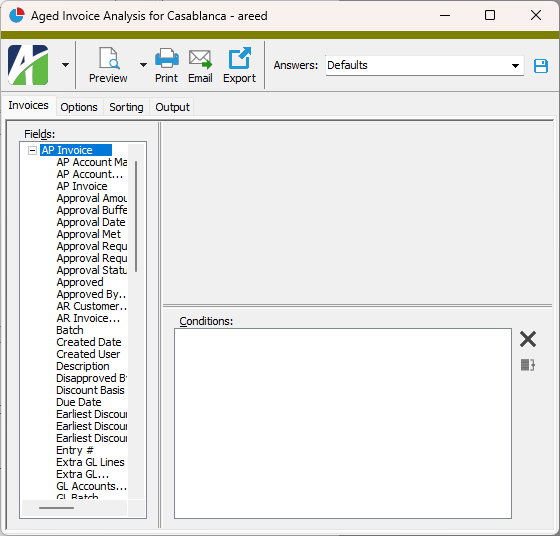
- Define any filters you want to apply to invoices represented in the data.
- Select the Options tab.
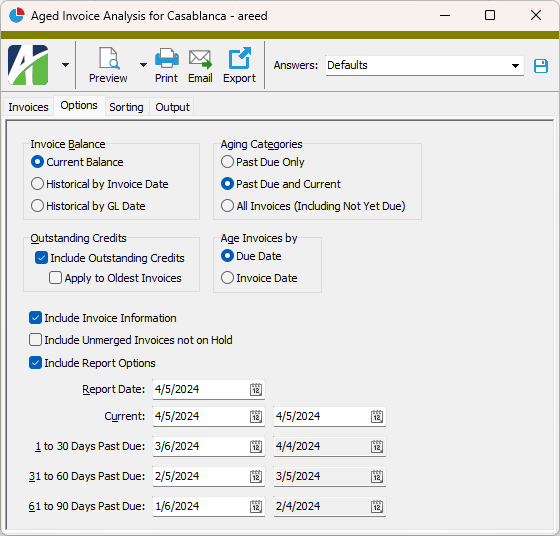
- In the Invoice Balance field, select how to present the invoice balance. Your options are:
- Current Balance
- Historical by Invoice Date
- Historical by GL Date
- In the Aging Categories field, select which aging information you want to show on the report. Your options are:
- Past Due Only
- Past Due and Current
- All Invoices (Including Not Yet Due)
- In the Outstanding Credits section, indicate how to handle outstanding credits.
- To include outstanding credits on the report and age them in the appropriate aging column based on their due date, mark the Include Outstanding Credits checkbox. To exclude outstanding credits, clear the checkbox.
- If you marked the Include Outstanding Credits checkbox, the Apply to Oldest Invoices checkbox is enabled. Mark the checkbox if you want to include all credit-balance invoices, even those not yet due, and apply them to the oldest aging columns with outstanding balances. If you do not mark the checkbox, and if you are not including "Not Yet Due" invoices, then credit-balance invoices that are not yet due are excluded.
- In the Age Invoices By field, select the date to base aging on. Your options are:
- Due Date
- Invoice Date
- In the Report Vendors By field, select the primary sort for the report. Your options are:
- Code. Sorts by vendor code.
- Description. Sorts by vendor description.
Note
Because the vendor description is not required on vendors, the report adds "Code" as an additional sort even when "Description" is selected.
- To show invoice detail, mark the Include Invoice Information checkbox.
- To include unmerged invoices if they are not on merge hold, mark the Include Unmerged Invoices not on Hold checkbox.
- To include a section at the end of the report with the report settings used to produce the report, leave the Include Report Options checkbox marked. To produce the report without this information, clear the checkbox.
- In the Report Date field, enter the date from which to calculate historical balances. The remaining date fields default to values based on this date and on the aging categories.
- If you need to override the aging category date ranges, enter the correct range of dates for the "Current" category and any beginning date ranges which need to change. ActivityHD automatically calculates the ending dates for you. The date ranges must be contiguous and continuous.
-
Select the Sorting tab.
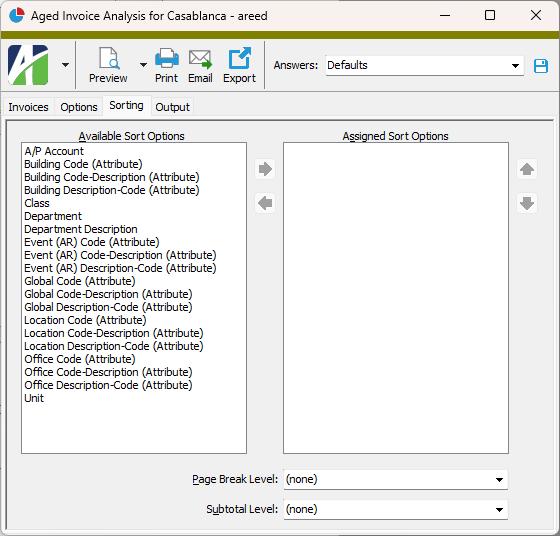
- In the Available Sort Options list box, highlight the field(s) to sort the report by, then click
 to move your selection(s) to the Assigned Sort Options list box.
 - If you selected multiple sort fields, use
 and
and  to arrange the sort fields in the order you want them applied.
 - If you want the report to start a new page for each change in one of the sorting options you specified, select the sorting option to break on from the Page Break Level drop-down list. If you do not want to insert page breaks, accept "(none)".
- If you want the report to subtotal based on one of the sorting options you specified, select the sorting option to subtotal on from the Subtotal Level drop-down list. If you do not want to show subtotals, accept "(none)".
- Select the Output tab.
- In the Design field, look up and select the report design to use.
- In the toolbar, click the icon for the type of output you want:
- - Provides access to two preview options.
- Preview - Click the icon or click the drop-down arrow and select Preview from the drop-down menu to view the report in the Crystal Reports viewer.
- Preview to PDF - Click the drop-down arrow next to the icon and select Preview to PDF to view the report in the PDF reader.
- - Opens the Print dialog so that you can select and configure a printer and then print a paper copy of the report.
- - Opens the dialog so that you can address and compose an email that the report will be attached to. For best results, ensure your email client is running before you attempt to send a report via email.
- - Opens the Export Report dialog so that you can save the report to a file. File types include Crystal Reports (.rpt), PDF (.pdf), Microsoft Excel (.xls), Microsoft Word (.doc), rich text (.rtf), and XML (.xml).
Data extensions
The following data extensions are available for the report:
- Vendors
- Invoices
Cash Requirements Report
Purpose
The Cash Requirements Report lists outstanding invoices by vendor and amounts due by date range. You can use this report to project cash needs and to manage cash flow.
Content
For each vendor included on the report, the report shows:
- vendor description
- vendor class
- outstanding invoices for the vendor
- balance due to the vendor.
For each invoice included on the report, the report shows:
- invoice number
- due date
- balance
- amounts due by date range.
In addition, you can include one or more of the following:
- invoices due before the earliest date in your date ranges
- invoices due after the latest date in your date ranges
- vendors with a balance of zero.
The following totals appear on the report:
- grand totals.
Print the report
- In the Navigation pane, highlight the Accounts Payable > Vendors folder.
- Start the report set-up wizard.
- To report on all or a filtered subset of vendors:
- Right-click the Vendors folder and select Select and Report > Cash Requirements Report from the shortcut menu.
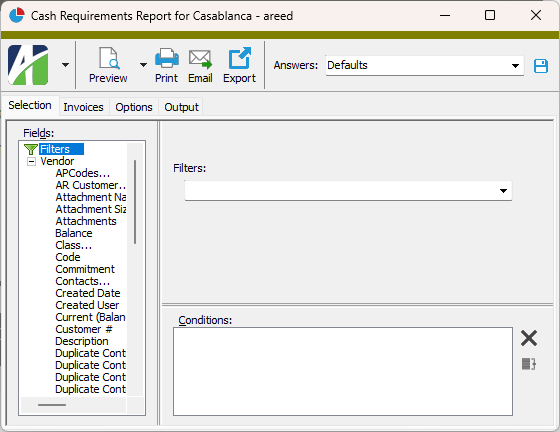
- On the Selection tab, define any filters to apply to the data.
- To report on specifically selected vendors:
- In the HD view, select the vendors to include on the report. You can use Ctrl and/or Shift selection to select multiple records.
- Click and select Cash Requirements Report from the drop-down menu.
- To report on a particular vendor from the Vendor window:
- In the HD view, locate and double-click the vendor to report on. The Vendor window opens with the vendor loaded.
- Click and select Cash Requirements Report from the drop-down menu.
- To report on all or a filtered subset of vendors:
- Select the Invoices tab.
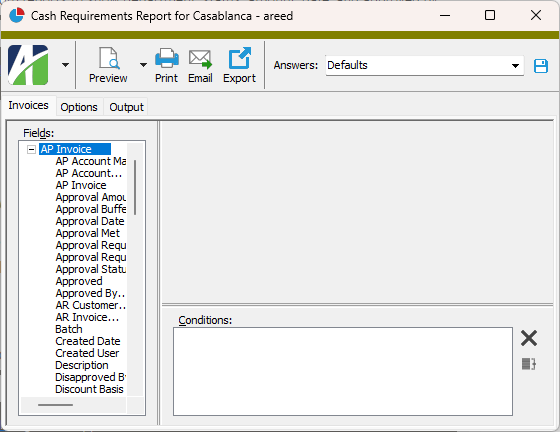
- Define any filters you want to apply to invoices represented in the data.
- Select the Options tab.
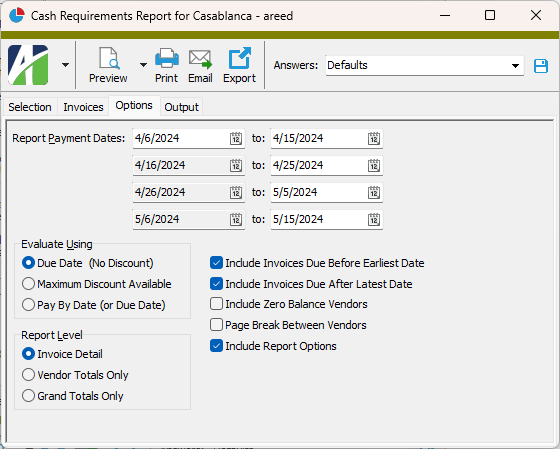
- Use the Report Payment Dates fields to define four contiguous payment date ranges to use for your cash requirements analysis. In the first row, enter the beginning and ending dates for the first payment date range. The remaining beginning dates are calculated from the ending date of the prior date range. Enter the ending dates for the remaining ranges.
- In the Evaluate Using field, select the date to base your analysis on. Your options are:
- Due Date (No Discount)
- Maximum Discount Available
- Pay By Date (or Due Date)
- In the Report Level field, select the level of detail you want to see on the report. Your options are:
- Invoice Detail
- Vendor Totals Only
- Grand Totals Only
- Mark the checkbox(es) for the additional information to include:
- Invoices Due Before Earliest Date
- Invoices Due After Latest Date
- Zero Balance Vendors
- If you selected "Invoice Detail" in the Report Level field, the Page Break Between Vendors checkbox is enabled. Mark the checkbox if you want information for each vendor to start on a new page.
- To include a section at the end of the report with the report settings used to produce the report, leave the Include Report Options checkbox marked. To produce the report without this information, clear the checkbox.
- Select the Output tab.
- In the Design field, look up and select the report design to use.
- In the toolbar, click the icon for the type of output you want:
- - Provides access to two preview options.
- Preview - Click the icon or click the drop-down arrow and select Preview from the drop-down menu to view the report in the Crystal Reports viewer.
- Preview to PDF - Click the drop-down arrow next to the icon and select Preview to PDF to view the report in the PDF reader.
- - Opens the Print dialog so that you can select and configure a printer and then print a paper copy of the report.
- - Opens the dialog so that you can address and compose an email that the report will be attached to. For best results, ensure your email client is running before you attempt to send a report via email.
- - Opens the Export Report dialog so that you can save the report to a file. File types include Crystal Reports (.rpt), PDF (.pdf), Microsoft Excel (.xls), Microsoft Word (.doc), rich text (.rtf), and XML (.xml).
Data extensions
The following data extension is available for the report:
- Vendors